Hello!
In this article, I will write about how to install apps using a tool called ADB. With its help, you can do many things with Android devices (phones, Android Wear watches, TVs and smart TV set-top boxes running Android TV or Google TV).
What is ADB?
ADB or Android Debug Bridge is a tool for developers. If you have been involved in programming mobile applications for Android you have probably already used it, even unknowingly.
There is a lot that ADB can do, too much to cover in one article (unless it's a very long one), so in this article I will focus on the basic use, namely installing applications on an Android device from a computer.
The procedure looks similar on all Android devices.
Requirements:
- Computer
- Android device
- Wi-Fi network (you can also use a USB cable or Bluetooth, I will however use ADB over the network
- Basic knowledge of using the command line (recommended)
- If you are using Windows I recommend installing Windows Terminal
Set up ADB on your comouter
If you have already used the Android developer tools, it is likely that ADB is already installed on your computer. You need to open a terminal and type the command "adb". If a list of commands is displayed, your computer is ready (see image below for an example of how ADB installed responds).
But if ADB is not installed, get it here:
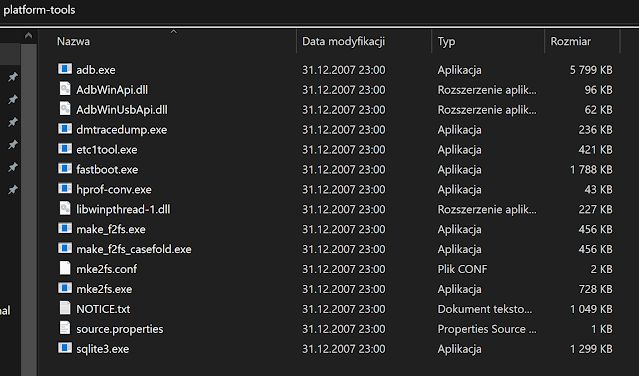
You will need to download the SDK ("Download SDK Platform-Tools for...") for your operating system. You will download a ZIP file from which you should extract the platform-tools folder.
Open the command line and get to this folder using the method appropriate for your operating system. You may be able to do this by right-clicking in the folder and selecting "open in teminal". If not, we have to open the command line using the default method (e.g. on Windows we search for "cmd" or "Command Prompt" or "Powershell") and use the command "cd [folder]" to get to the downloaded folder with ADB.
Once we get to the folder, we start ADB using the command line. On Windows, this will be prefixed with ".\adb.exe".
For the rest of this article, I assume that ADB was already installed and the command is "adb [rest of command]". However, if you have only just installed ADB using the above method, use the command ".adb.exe [rest of command]" or another to use a folder file suitable for your operating system.
Starting ADB on your phone
To start with, you need to open the developer settings (possibly also called developer settings). In the Phone Info, find the line "build number" (build number) or "firmware version" (firmware version) and click on it until you see a message that these settings have been unlocked.
In the developer settings, find and enable wireless debugging, then click on this option to open the details.
Then click on 'Pair the device using the pairing code'. A pop-up with the IP address and code will appear, as below.
Next, we enter the command "adb pair [IP address]", then we have to enter this pairing code.
If this is successful, the computer will appear in the list on the phone and in the terminal we will see Success as in the image above.
Let's then connect using the IP address and port, which I have marked with a blue arrow in the image below:
Command: "adb connect [adres]"
Now we are connected.
I recommend that you place the .apk file in the same folder where Terminal is open (if you are using the newly downloaded ADB, this will be the same folder it is with adb.exe)
I am going to install
Minetest, I named the file minetest.apk
I execute the command: "adb -e install minetest.apk", after which the installation starts.
If it fails and it's not an error related to the application itself, it's possible that it's an "adb: error: failed to get feature set: more than one emulator" error. This means that multiple devices have been registered in ADB. You should then use a variant of the command that specifies the device by IP address:
"adb -s [address] install minetest.apk".
Hint: you can display a list of devices and their IP addresses with the command "adb devices"
If the installed application is running, disable wireless debugging for security.
Installing apps via ADB on Android Wear watches
The procedure is similar to that on phones.
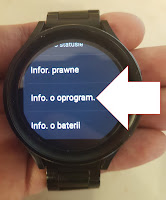
First, in the information, we click repeatedly on the software or kernel version to unlock the developer options.
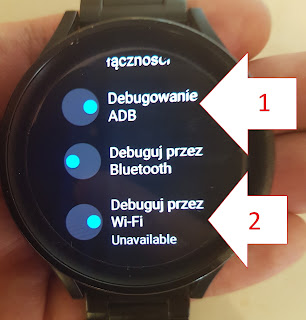
Then, in these settings, we run ADB debugging (1) and Wi-Fi debugging (2):

We then open the details, select pairing via code and use the command "adb pair [IP address]" to pair the watch.
Then we connect to it with the command "adb connect [address]". In this case, the address shown below, ending in port :5555 was the address for connecting the ABD. The device can also display additional confirmation prompts.
You can then install the application with the command "adb -e install [apk file]" (e.g. "adb -e install minetest.apk"), or if you have multiple ADB devices registered; "adb -s [address] install [apk file]" (e.g. "adb -s 192.168.1.30:5555 install minetest.apk").
When finished, disable ADB Debugging and Wi-Fi Debugging for security.
Problems and solutions
Many problems or deviations may occur during this process.
Above all, messages and security features may differ between devices and Android versions.
If the app does not want to install, it is most likely caused by one of these problems:
- The APK file is for a different type (architecture) of processor than is in the target device.
- The APK file is for a newer version of Android than is on the device.
- The APK file is corrupted.
- The target device has too little memory to install the application.
Always choose APK files from safe and trusted sources, suitable for your device.
That's all in this article. If you have any problems, please feel free to comment. Thank you!
- Wojtekb30
PS: Using ADB can be risky. I take no responsibility for the consequences of using this tool.


Comments
Post a Comment